So I have two more battles for you with this update! Over September I had planned to get four games in, but the first one was cancelled as my opponent wussed out/had to look after his kids and the second one was delayed as I rescheduled the first one – which was then cancelled again. Thanks, DJ. One day we’ll play a game!
While I cursed DJ and prayed to the Dice Gods to set his beard a light in his sleep, I also got to play Matt “The Stampede”’s Beast Herds tournament list and got another game against Mike’s redesigned Vermin Swarm list. Both games held some concerns beforehand for me, and both held some surprises too. I’d like to thank both of them for some very fun and very educational games – I definitely learned a lot about my army and tactically!
A quick note of acknowledgement here. Having misread the rules for BSB’s, I have been playing with an illegal list – since these games I have amended it, and going forward the list will be totally legal. The only net upshot of me ‘cheating’ was that my BSB got the Giant’s Blade. Yes, this made him very killy in combat – but it hasn’t been a massive, game winning imbalance. And as part of the points reshuffle, and some education about how disgustingly over-powered the Magic Resist rule is, I have now covered the gap in my main Spearman block’s defences when it came to Magic. So I learned something important, now have a legal list and my main infantry block is even better defended.
Result!
Game 3 – The Stampede (Chad’s Dread Elf Vikings vs Matt’s Beast Herd Stampede):
Without even playing Matt’s list I knew most of its parts, how it would play and what its goals in life were. This is because I, as his flatmate, fellow 9th Age player and suspected close friend, have been the sounding wall for him during the R&D and creation stages. And I knew its parts were bestial, it wouldn’t play nice and its goals in life were to charge things, and then preferably over them.
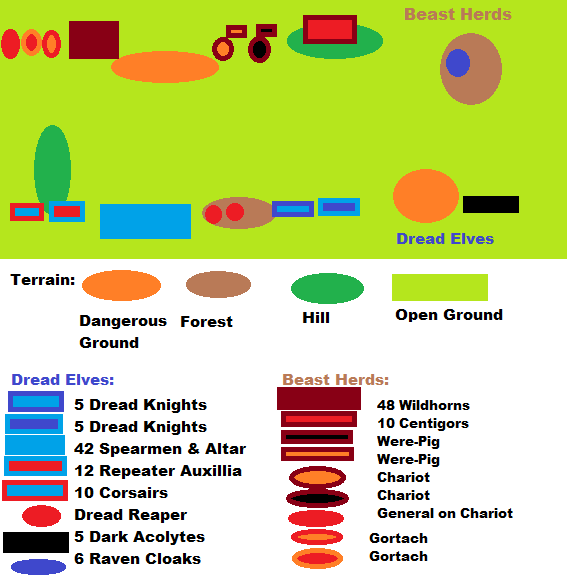
A Rough Overview of the Stampede:
Lord in Chariot with lots of magic armour and weaponry.
BSB with a Magic Standard that once per game grants the bearer’s unit +1S.
Centigor Hero with Magic toys.
Level two Shaman on Wilderness.
48 Wildhorns with extra hand weapons.
2 Chariots.
2 Were-Pigs.
2x 14 Ambushing Wildhorns with & Paired Weapons.
10 Centigors with Throwing & Paired Weapons.
2 Gortachs
For those of you unfamiliar with Beast Herds, they basically get Orc infantry (S3, T4, average LD and I3) that have a rule called Primal Fury – each combat round they take a leadership test and, if the pass, they get to re-roll misses in that combat round. And Matt had got 48 of them. Who could get +1S once per game from the banner, and an additional +1S and +1T from the Signature Spell on Lore of Wilderness. Which means a block of S5, T5 dudes with paired weapons in horde formation. Yes, Matt also shares my opinion that blocks are king of 9th, and crushing the enemy block will win you the game. I was pretty damned wary of engaging it in combat if it had any kind of support.
Oh, and there are not one, but two Gortach. S & T six with just as many wounds, and the ability to regenerate those in combat makes these beasts terrifying – especially compared to the runtish monsters available to Dread Elves! Worse, my ‘artillery’ is equivalently spitting at a forest fire. So that eliminated the normal tactic of cannoning them apart. Oh, and they move seven inches. Great.
Upsides? They’re buck naked. Literally no armour on anything that’s not a character or doesn’t have wheels. This meant even my Corsairs’ repeater hand-bows would be able to pick a few off if I was half lucky, and that my piddly S3 combat attacks wouldn’t be prevented like they normally were by things like plate mail and thin, gauzy cloth. Also no ranged fire power besides throwing weapons and harsh language, and his one wizard was devoted entirely to buffing the block, meaning my units would be pretty much intact by the time bases were touching each other inappropriately. And maybe I could snipe a Gortach down, who knows.
Deployment
Don’t get excited. This graphic took me roughly an hour to put together at work (and is pretty bloody poor) so there won’t be one for each turn until I get much better at it. However, it does help me illustrate (ha ha) the deployment stages.
As is becoming habit for my army, I dropped all of it at once to ensure first turn. The extra Magic phase is always going to be useful, and normally I get to deny some shooting. In the case of Matt’s Stampede, it delayed the arrival of his ambushers with I weighed above having the last chance to move. Sure, my own shooting would be pretty pathetic at long range but the extra shots might help.
I shoved my Dread Reapers in the central wood tactically to give them some cover from incoming fire, forgetting Doran wouldn’t have any, and then lined my Cavalry up on the far side to loosely cover that flank. The block went down on my centre-left as it was the biggest open space and I hoped Matt would either face off against me or line up against my cavalry, letting me use the Dangerous Ground to guard my flank as I flanked him. My General, BSB and Wilderness Sorceress went in the big block. The Auxillia and Corsairs went down to the left of the block as flank/ambush protection/fodder.
Matt faced his chariots off against my cavalry, with his Centaurs going on my centre right to support them. His block faced off against mine in a very British manner, and then the Gortachs and the General went on my far left, somewhat squashed in against the board edge. I had been worried he’d put his army down in a reverse position, throwing his chariots and pigs in early against my block for some early cheap impact hits and kills while his block went through my small cavalry units and ignored my artillery fire. This way the Gortachs and general had far less room to manoeuvre, which was great, but it meant my chaff infantry were doomed for a stomping and unless I won the awkward dance off for charge range my chaff cavalry were similarly threatened by the chariots. However, my Raven Cloaks got pick of placement and hid in the wood near the Centaurs, hopefully harassing them into wasting time charging them down, and the Assassin donned his Auxillia uniform again and pretended to be a repeater Crossbowman beside my Fire Sorceress. Not especially happy with deployment, especially with almost thirty more Wildhorns to come on near definitely behind me, I shook Matt’s hand and prepared to weather the stampede.
Turn 1
I shuffled my Dread Knights forward, out of charge range of the chariots but close enough to threaten their advance, and the Dark Acolytes screamed round to yell harsh language at the Centaurs – their 20” move with Free Reform makes them scarily mobile. Even being strung out on the flank as they were they were almost immediately relevant, and could definitely get involved in the battle proper when needed. My magic was pathetic, however, and my shooting resulted in a chariot losing two wounds and one Centaur being pin cushioned by the Raven Cloaks. This was in part due to Matt’s Shaman having Dark Rain, meaning all my shooting was at -1 to hit, but mostly down to the fact my shooting was as about as token an effort as Hitler’s equal rights movement.
With no combat, we moved to Matt’s turn where his block, Gortachs and general surged forward in a fashion not dissimilar to the wildebeest charging down the ravine where Mufasa died. His chariots and pigs moved forwards, but since they had the same movement as my Dread Knights Matt had a difficult decision about how to play the charge distance dance. He eventually decided to stay at seventeen inches – possible, but improbable a charge distance – to tempt my furthest right unit of Dread Knights. The Centaurs didn’t move very much (if at all) so as to threaten the advance of my Dark Acolytes, not deeming my Raven Cloaks a big enough threat.
Turn 2
My Dread Knights were reminded how little my Fleet Commander general valued their lives when the order to charge into the line of chariots and were-pig muscle coming their way. Matt may have used my well-developed tactic of yelling “COWARD!” at me when I appeared to think about it, and then was filled with instant regret as the reptile riding elite crashed into his chariot with a mighty 17” charge!
There were no other charges for now. My Raven Cloaks and Dark Acolytes moved out of the Centaurs charge arc and charge ranged respectively, while my block awkwardly shuffled round a bit. The other Dread Knights moved around to more closely cover the Spearmen’s flank against the remaining chariot. My magic phase was not grand, managing to burn a couple of Wildhorns, but my shooting phase outdid it on the ineffective scale as everything was directed at the nearest Gortach, which laughed at the rather unimpressive attempt to hurt it. The Dread Knights only managed two wounds on the chariot, but Matt missed with everything so I won by a convincing four – made more convincing by the chariot having no general or BSB support, meaning it fled! This panicked both pigs but the remaining chariot was just in BSB range so stuck about. The Dread Knights caught the chariot and stayed hot on the heels of the nearest pig.
Shaking his head, Matt rallied one pig but not the one that was a single inch of being lizard chow and it understandably kept going, almost making it to the board edge. The Centaurs wheeled to get an arc on my Dread Knights next turn, once again ignoring my Raven Cloaks who had managed to forget to put tips on their bolts last turn. Both ambushing units turned up and, in an interesting Turning Point, turned up behind my chaff Corsairs and my Auxillia unit rather than threaten my block. Matt later explained that it was because he didn’t think he could make much of a dent in the block, which is fair to an extent – I would still have tried, personally. Any dead elves here were less Dread Elves later.
The Gortachs didn’t charge, as they didn’t have Swiftstride and Matt didn’t want them out of position in my turn. His head-banging Wildhorns moved up beside the Gortachs, with the general tailing them a little behind – not being able to march was a massive issue, Matt had found. Magic saw my Spearmen have their movement reduced to a measly 2”, yet more insurance against a counter charge. Shooting saw my Corsairs lose one of their number while the Auxillia lost three. The Dread Knights frowned down the volley of beer bottles and other hobo-junk the Centaurs threw at them. No current combats so we moved into turn three.
Turn 3
Crunch time. The Gortachs were both in range of my chaff units and I doubted my so far ineffective missile fire was going to impede them. The Fire Sorceress legged it over to the main block and both the Corsairs and Auxillia did an about face, on the basis that if they couldn’t see the Gortach then the Gortach couldn’t see them. This somewhat dubious tactic was tied in with carefully placed fronts and flanks, meaning that the Gortachs would be facing the wrong way for over run moves. It simultaneously doomed roughly 250 points of elves but that seemed a much better plan than a poorly though rescue operation.
Besides, I’m playing the bad guys. If I can’t sacrifice my more useless henchmen for the greater good/victory what’s the point, right?
The Dread Knights plowed into the pig at the board edge, readying their lances for bacon skewers. Magic saw a Red Wood Shaft impale and destroy the remaining chariot, and allow my block a magical movement which I used to reform it so it had most of the Stampede in its front arc. The remaining pig was shot at by both Dread Repeaters but it appeared I’d actually brought Dreadful Repeaters and no wounds were caused. I think I managed to kill three Wildhorns across the two ambushing units with the Corsairs and Repeater Auxillia, but since they were marked for trampling I didn’t fret too much. More importantly the Raven Cloaks had moved up right behind the Centaurs and opened up on full-auto, felling three and making them run! Critically this meant that they couldn’t charge my Dread Knights next turn.
The pig survived long enough to pull a Dread Knight from his mount before being ripped apart by the barely-tame giant lizards. My Dread Knights decided not to overrun off the board, in light of the Centaurs fleeing.
At the start of Matt’s Turn 3 I revealed the Assassin in the Auxillia since they weren’t long for this world. He charged anyway, one ambushing unit going into each of my chaff and both Gortachs going into the Auxillia. Stand and shoot did nothing to stop the stampede from hitting home, so both units clenched and braced for impact. The remaining pig charged into the forest to get one of the Dread Reapers while the Centaurs rallied, facing the Dread Knights. The Wildhorn block and Matt’s general shuffled forward, the former inhibited minorly by the Dangerous Ground and the latter by failing a pretty optimistic charge into the Corsairs. I countered everything in the Magic phase because I didn’t want anything to worry about, most importantly the big Wildhorn block getting +3I and +D3 charge distance! Shooting saw a Dread Knight fall to the hobo-refuse thrown by the Centaurs.
The main event was clearly combat, as it was always going to be in this game. Impact hits from the pair of monsters killed three elves. The Assassin decided that since he had an equal chance to hurt everything he may as well go for the Gortach standing over him and proceeded to carve half the beast’s flank off! The remaining Auxillia were too awestruck to achieve anything and were then slaughtered, leaving the Assassin on his own. He legged it, for obvious reasons, and managed to evade the pursuit of the two Gortachs!
Turning Point: Matt realised sometime in Turn Four that he would have had a Stomp attack to make, which had precisely a 5/6 chance to smear the plucky Assassin. At that stage we could have feasibly rewound the game and I should have offered – but I didn’t, because he didn’t ask and I was struck by a massive lightning bolt of autism so didn’t offer. In that one moment I accidentally became the type of person who gives the hobby a bad name, and even though I did apologise on the way back to our flat I’m going to take this opportunity to apologise again. I’m sorry I didn’t offer, Matt.
The ambushing Wildhorns reined in their fury and didn’t pursue, threatening the flank of the Spearman block instead. The Corsairs actually survived, their 4+ save saving five out of nine. The Reaper crew failed to pathetically stroke the were-pig to death and got eaten, with the pig overrunning out the back of the forest. The other Reaper crew held, apparently too busy looking the other way to notice their compadres’ fate.
Turn 4
I began by rallying the Assassin. Since the Gortach he’d wounded had regenerated half the damage by chowing down on the Auxillia he still had an objective to achieve, and wasn’t going anywhere. I then immediately prevented him completing it by hurling my main Spearmen block into the side of said Gortach, throwing caution to the wind and letting the nearby ambushing Wildhorns have a free shot at my flank. Slowly realization dawned on my Assassin he was meant for grander things as he turned towards the second, uninjured Gortach.
My Dread Knights turned to face the probably inevitable charge of the Centaurs, the Raven Cloaks danced around the horse-men’s flank again ready to rapid fire into them once more and the Dark Acolytes screamed a full 20” across the field to get in range of the unengaged Gortach to try and sneak some extra wounds through.
Magic saw this succeed, with two wounds caused by their Bolt of Darkness – until Doran rolled box cars and saved both wounds with a double six! Shooting saw the Centaurs reduced to just two and the Centaur hero but this time they passed their panic check. The surviving Dread Reaper did two wounds to the were-pig with a shotgun volley of shots, and my Assassin managed three wounds on the Gortach, his poisoned daggers sinking deep into the beasts flesh. It’s response, however, was to just get more pissed off.
Combat was quick. My general turned the Gortach into sliced beef. The Headsman’s Axe is a beautiful and terrifying weapon, and I regret never considering it before writing this list. The Corsairs, either buoyed by the sight of their liege lord and captain felling the monster on the hill nearby or worried he’d do the same to them if they under-performed, hit with all ten of their attacks and wounded with nine of them. They only lost one in return and ran the fleeing Wildhorns down. We swiftly moved into Matt’s turn.
Matt charged the unengaged ambushing Wildhorns into the flank of my Spearmen, deciding it was worth the risk as a flank charge would mean no supporting attacks and might mean he could flank me with his main block. Matt’s general chose not to charge, instead taking a full seven inch movement to get his chariot in definite charge range for next turn. The Centaurs finally got to charge the three remaining Dread Knights, who held on the hope they’d be able to somehow win the combat. Both the main Wildhorn block and the remaining Gortach (just the one, hardly a threat or anything, definitely no cause for panic…) ran at the Assassin. The main block was looking to hopefully overrun into my Spearmen to join the other Wildhorns, while the Gortach wanted to smear my Assassin across the landscape.
The Assassin got to stand and shoot, however. He managed to find three knives somewhere on his person. The Gortach had three wounds left.
The Assassin landed three hits.
The Assassin got three wounds.
The Gortach failed its first save. Then its second. The dice span on the third and final roll for an unnecessary but dramatically appropriate long time…before coming up a six! The Gortach roared and staggered into combat, while the Assassin said his last prayer to Yema.
Shooting was non-existent and magic was equally unimpressive – Matt and I had spent most of the game either nullifying each other’s spells or failing to cast them in the first place. Combat saw the Assassin turned to mush by a full complement of impact hits from the Gortach – I took him off to save Matt the effort of rolling to wound. However, the Gortach’s considerable base size combined with the mass of slightly charred Wildhorns in the main block meant Matt’s plan to overrun was stymied, and he only got about two inches closer to my Spearmen. The Centaurs saw off the Dread Knights for the loss of only one of their own, but turned round to see the Raven Cloaks grinning at them as they reloaded.
This meant that the smaller Wildhorn unit had to face the blender alone. My general Made Way to get into base contact and eviscerated four and the Spearmen beside him killed another one each bringing my total to eight. Matt managed to get two wounds through from the surviving three – who managed a total of seven attacks between them thanks to magically granted Frenzy – but they had lost their rank so couldn’t Disrupt my Spearmen. They ran, and I chose not to pursue, setting my sights on the massive stampede of approximately forty Wildhorns ahead of me.
Turn 5
In an effort to answer the eternal question “Will it blend?” my Spearmen charged into Matt’s Wildhorn Stampede, I imagine with a lot of bloodthirsty whirring noises. The second unit of Dread Knights finally got to do something and spurred their mounts into the side of the last Gortach. The Corsairs pretended they were still overrunning, ingloriously preserving their points from a rear charge by Matt’s general. The Raven Cloaks back flipped out of the Centaurs charge arc while the Dark Acolytes got behind the Wildhorn block ready to cause difficult terrain tests to any fleeing Wildhorns.
Magic saw me roll a measly five and Matt happily dispelled my attempt at Beast Within and the Dread Reaper managed to miss all of its shots. The Centaurs were removed from play by the Raven Cloaks (or may have overrun last turn – they weren’t on the board at this stage, even if I can’t remember the exact reason) and we moved to the main event.
I had 31 attacks from my Spearmen and Sorceresses, seven S7 attacks from my general and BSB as well as the crew and medusa on the Divine Altar of Yema – plus impact D6+1 impact hits! Matt got a mighty total of 39 attacks back with his Wildhorns, using the banner to make them S4 for the round. I was hitting on 2+, wounding on 4+ and rerolling 1’s, with my characters hitting 3+ for the general and 2+ for the BSB, both wounding on 2+, rerolling 1’s. He was hitting on 4+ with rerolls, thanks to Primal Fury, and wounding on 3+.
When the dust settled, 39 lives were ended in that round of combat. 26 Wildhorns had been perforated while 13 Dread Elves had been hacked apart. Ranks and banners came to +1 in my favour, and combat resolution came to an impressive +14 to the Blender Block. The Wildhorns fled and I failed to catch them, but Matt called it there, only having his general left (more or less) and knowing that my block held a mighty 1100 points safe.
Aftermath
At this stage I’m pretty sure that the answer to “Will it blend?” is a resounding yes. Matt’s block was terrifying, larger and naturally tougher than mine with similar magical support. The lack of armour would have been more telling if I had taken any real shots at it – or if I had any real shots to take in the first place! Even if I had, there were so many other viable targets that I don’t think I would have got a proper chance to target his block.
What this all means is that Matt’s Wildhorn Stampede represented something of an apex for cheap horde blocks, and seeing my Spearmen churn through it has filled me with confidence that they are find against other horde blocks. I still want to face Ogres, Warriors of the Wastes and a large Dwarven great weapon block to be sure, but I am confident of my Spearmen out-performing anything in their type-class. I was scared in deployment, and scared when Matt picked up the best part of 40 dice to hit back at me – even though I’d eaten half way through his unit – but the Ward Save and Light Armour & Shield combination helped my guys survive.
Two units really shined in this battle, and the first of those were the Raven Cloaks. Sure, they spent all game harassing one unit – but that unit was potentially crippling for my under-strength right flank. They also earned their points nicely. The other model that finally got a chance to show was the Assassin – having spent the previous two games as a functional non-entity, this was his breakout block buster. He dealt enough wounds between the two Gortach to actually kill one, and could have managed it if Matt hadn’t made that blasted Stand & Shoot save.
Special mention to the Dread Knights who charged first turn. They didn’t fight anything particularly powerful, thanks to the intervention of the Raven Cloaks, but they did destroy half of Matt’s chaff and caused him a major headache. After selling their watches to their shipmates and donating to proceeds to the proceeds to the temple of Yema, they sold their lives at least as dearly and offered them as a greater sacrifice. This is how I need to use my heavy cavalry every game – contrarily to accepted tactics, they need to lance off into the sunrise and make sure they come back at sunset or not at all – taking as many cheap little units with them as possible.
Will I remember this in my next game? You’ll have to wait until the next post to find out! Hopefully this one keeps you interested enough to find out what happened in my second game against Mike’s Vermin Swarm!
